Bleach it out!

For this post I am going to do something a little bit different. I’ve mostly been posting DIY projects for your home and today I am going to do a project for your closet. A while ago I found a website that showed you how to tie-dye with bleach. I honestly don’t really care for the traditional tie-dye look. I think it looks slightly tacky with all the colours on a white shirt in a spiral pattern but this one is different. Instead of using dye, I am going to use bleach on a black shirt.

I will need the following to complete this project:

Black shirt (I bought one at Ardenes for $7); Clorox bleach; 2 pieces of wood (doesn’t matter what size); elastic bands; gloves; water; and a bucket.

DIY tie dye-9686

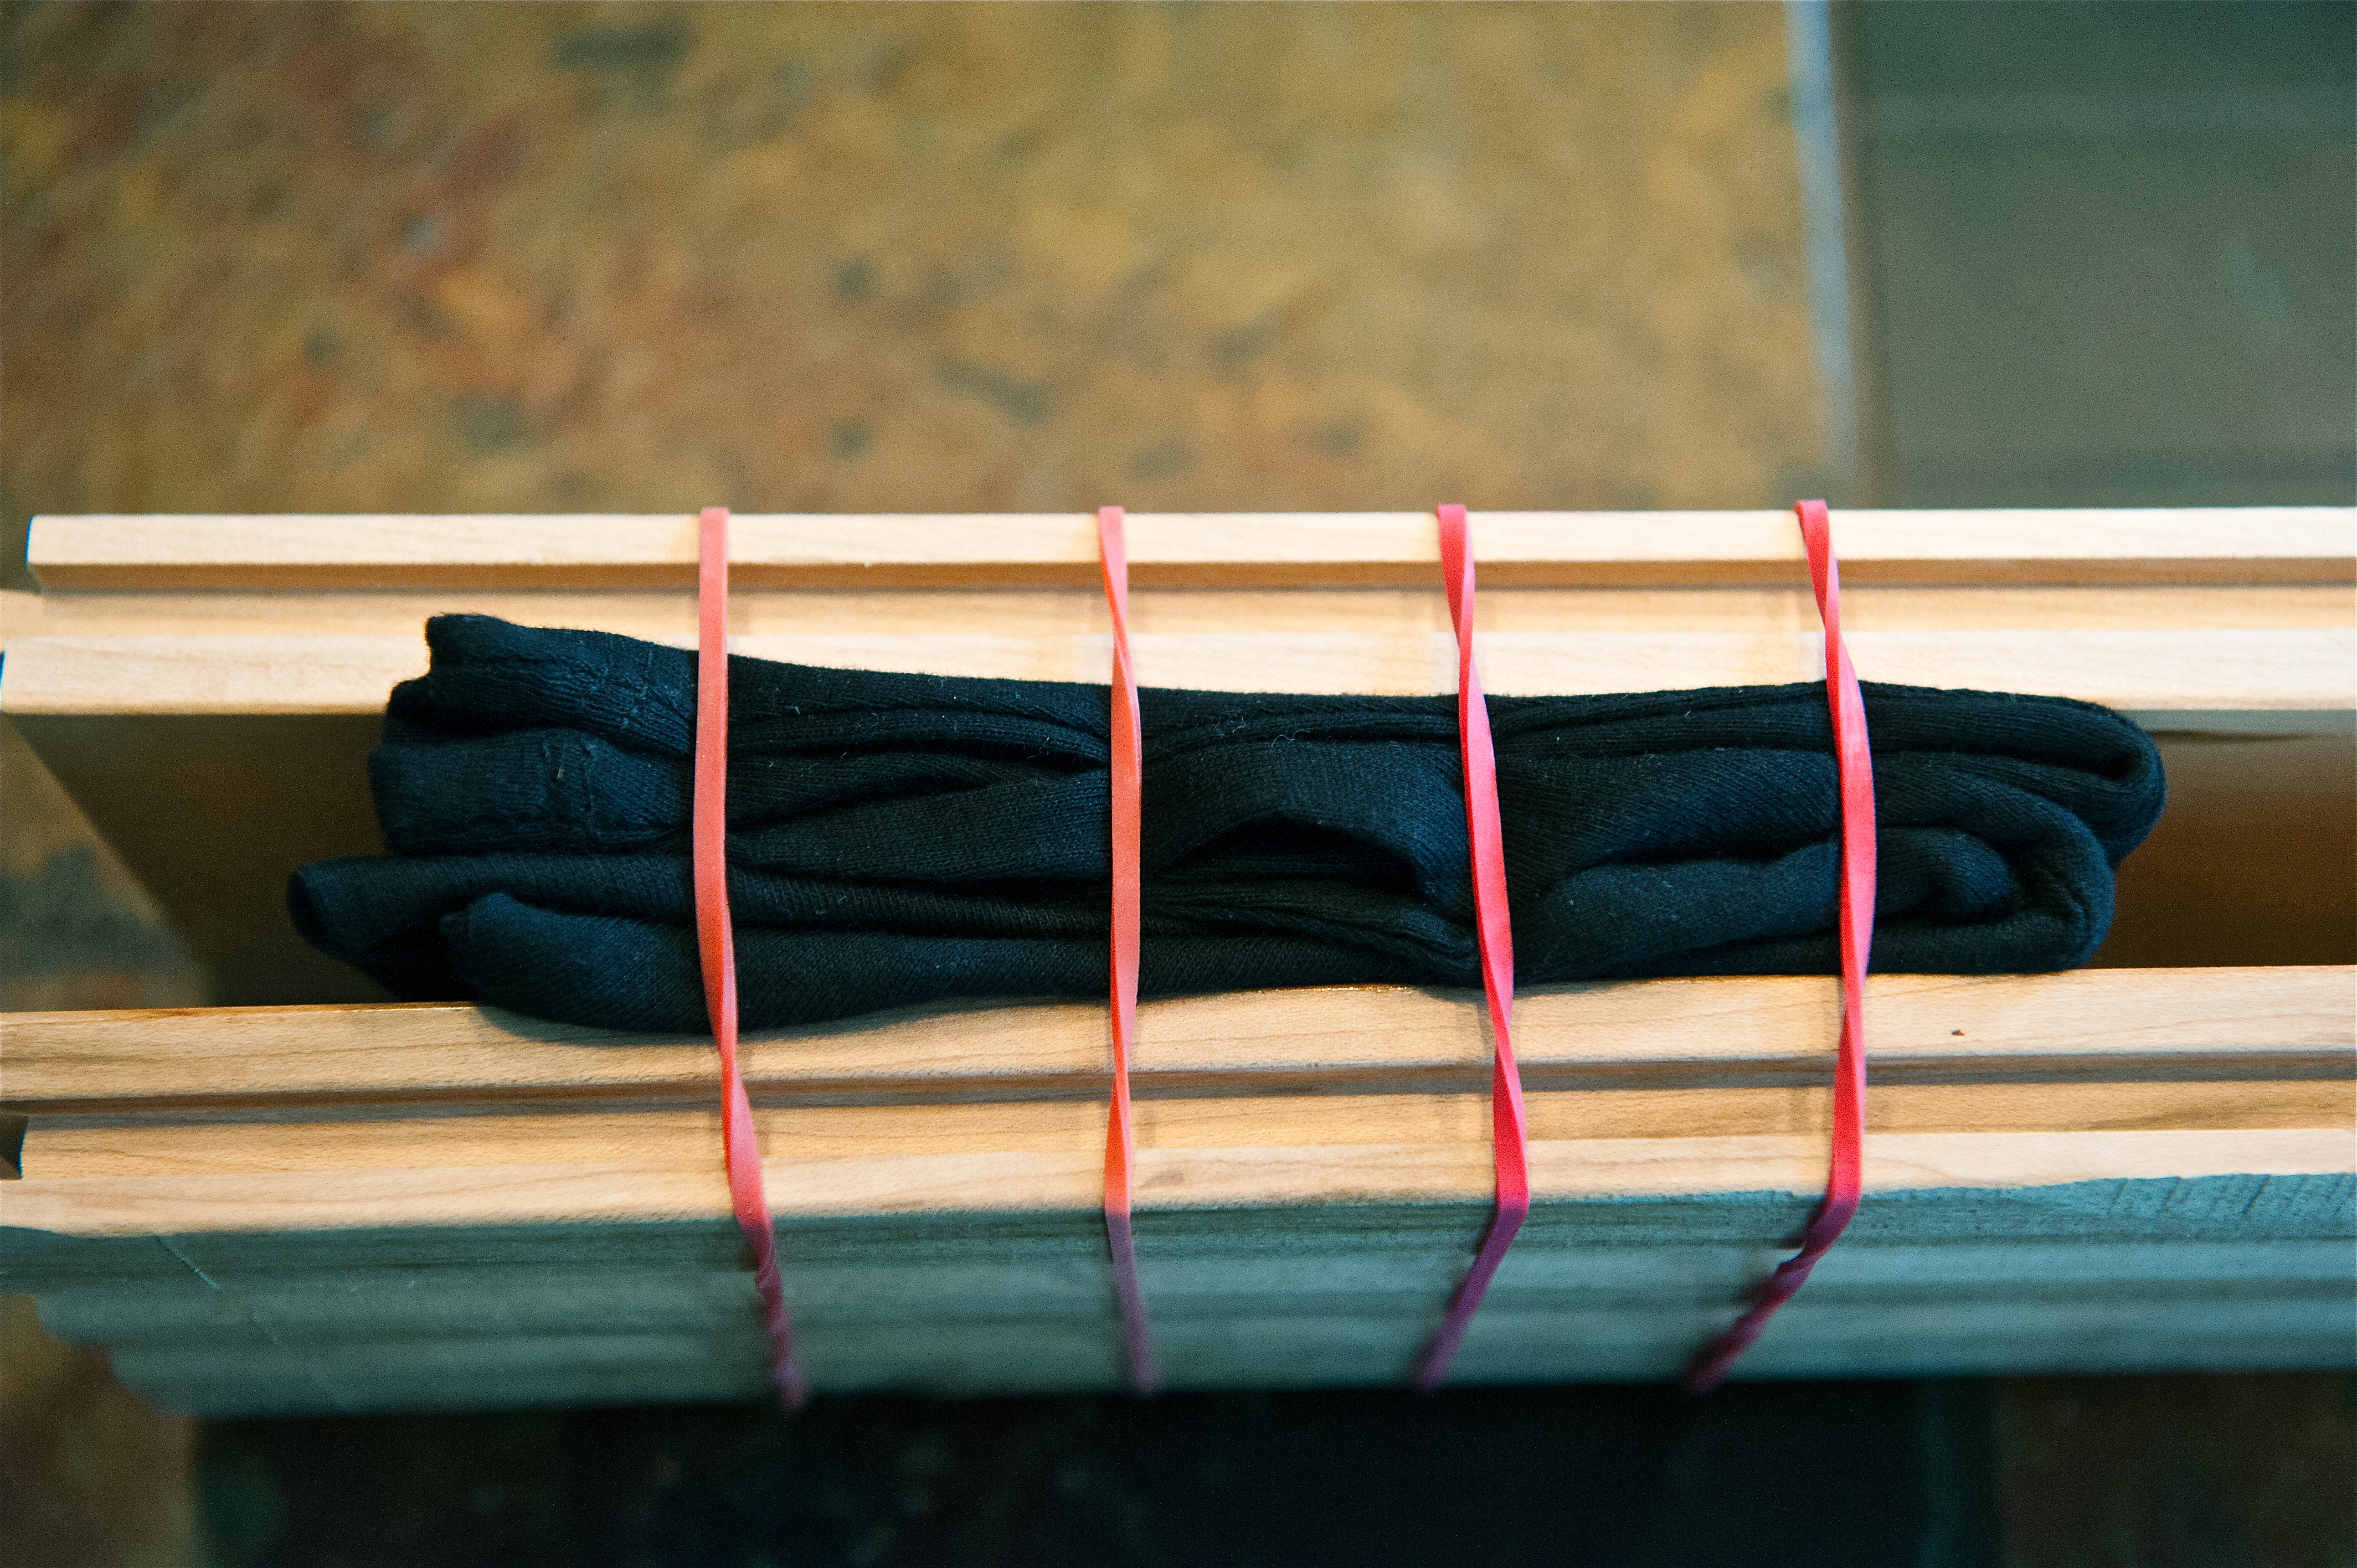
To achieve a grid-like pattern, I folded the shirt like an accordion. I then placed it in between the 2 planks of wood and secured it with rubber bands.

DIY tie dye-9713

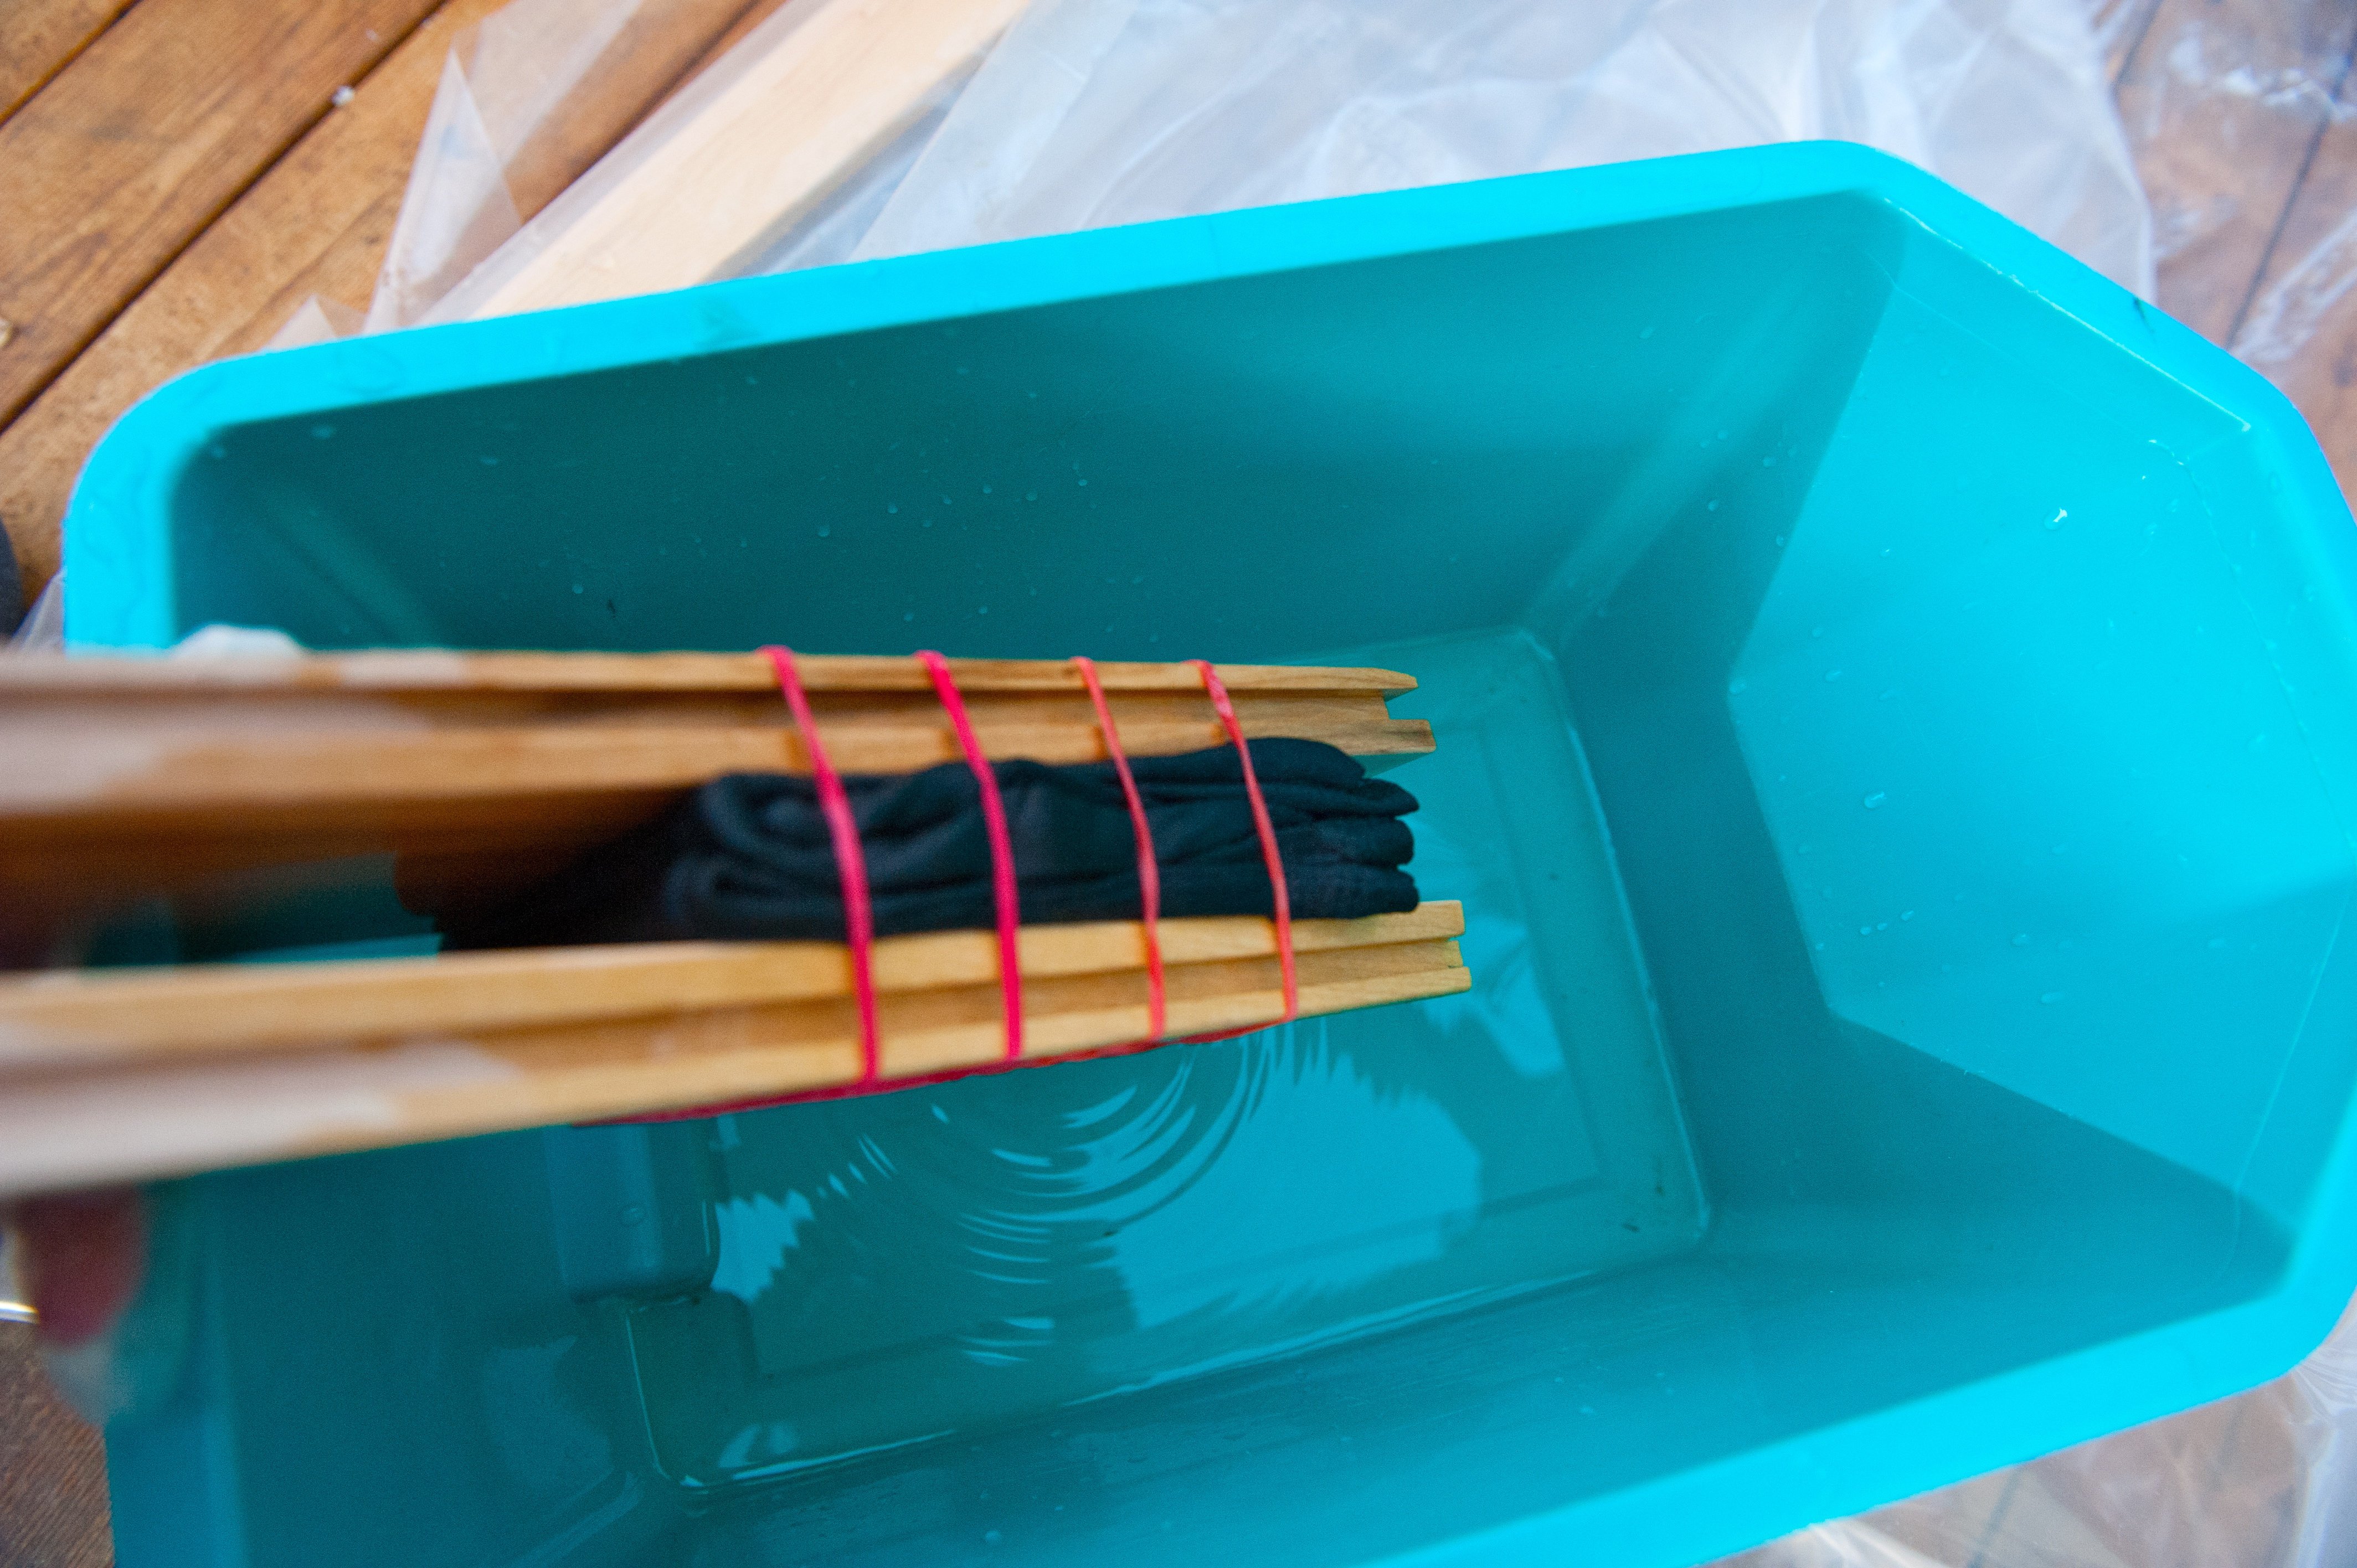
I mixed 4 cups of bleach and 1 cup of water in a bucket and went outside. You should be wearing gloves when you are working with bleach and always be in a well-ventilated area. Once everything was ready, I put the shirt into the bleach and left it in there for a couple of seconds. make sure you try and cover all open areas of the shirt with the bleach. Don’t leave it in for too long because depending on the thread count the bleach can erode the fabric.

DIY tie dye-9720

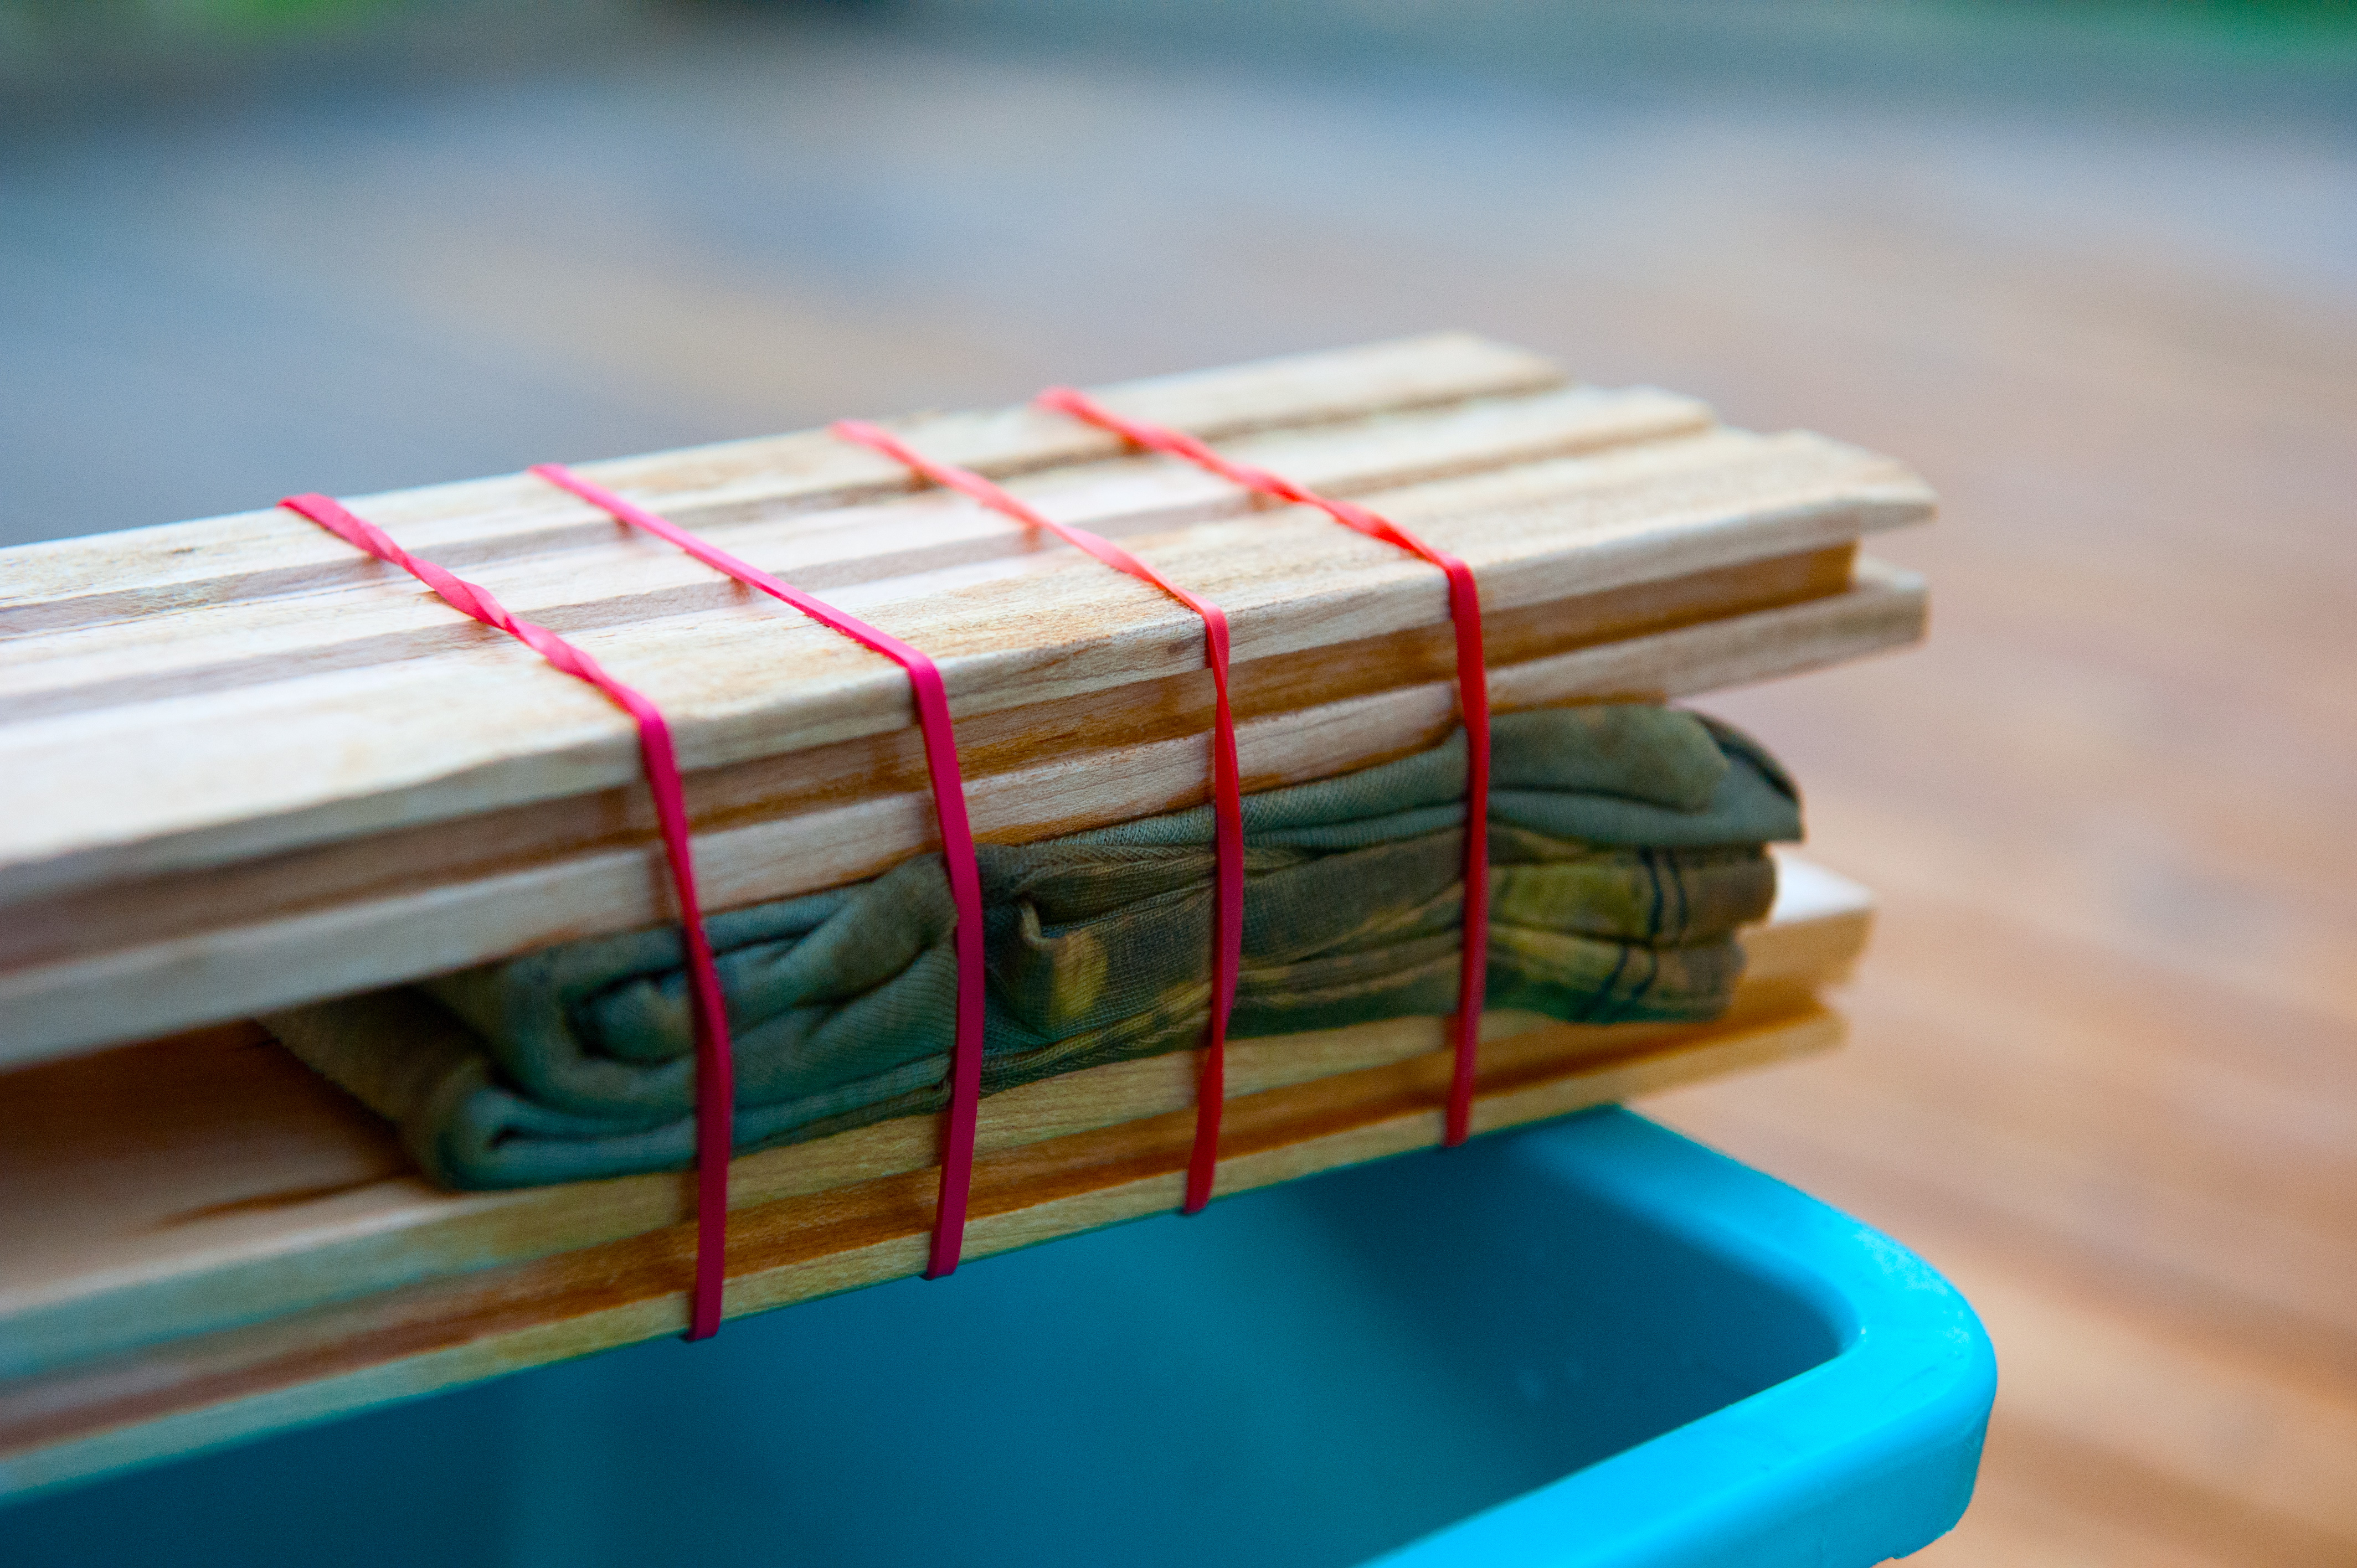
I let it sit for a while and watched it start to change colours. Once it turns a rusty colour, take it out of the bleach and rinse it with water.

DIY tie dye-9721

Then unbind it and let it hang to dry. After it has dried, wash the shirt in a washing machine.

DIY tie dye-9750

DIY tie dye-9769

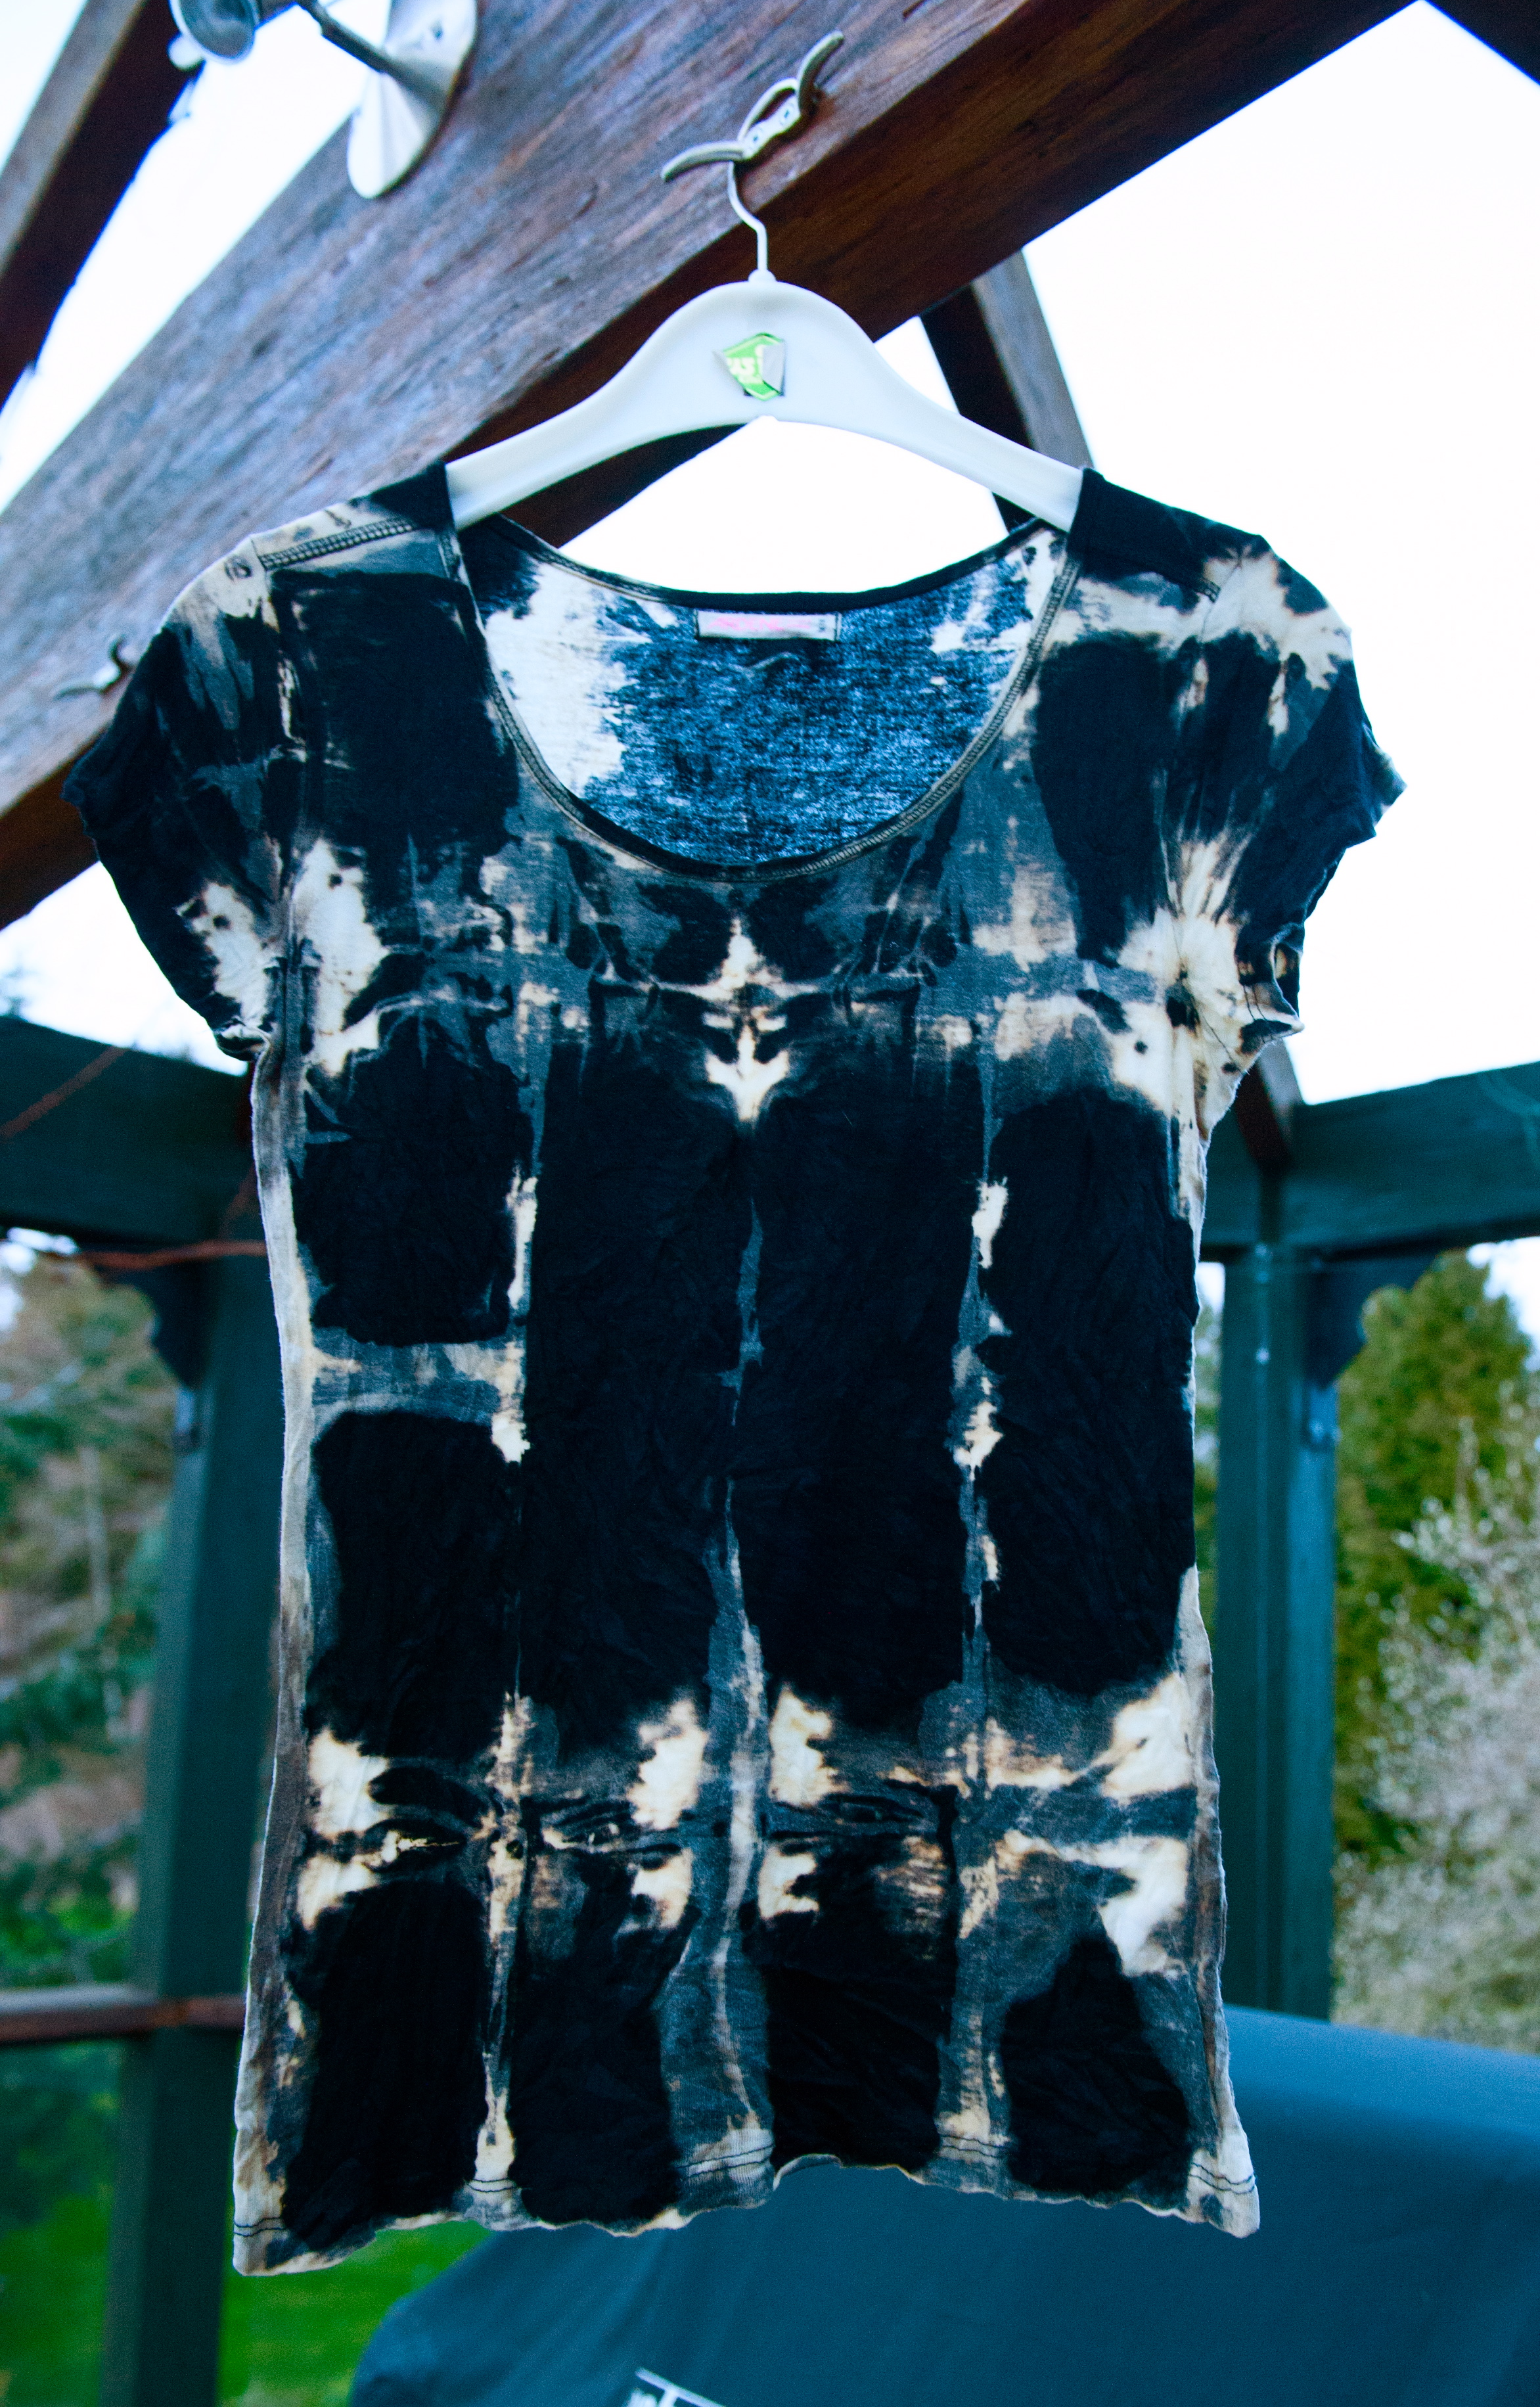
Here is the finished project! My sister so graciously agreed to model for the pictures. We really had no idea how to pose for them so this is what we came up with. We really like the shirt and have worn it a couple of times already. It looks great!

None of your bees wax!

I find lots of my inspiration on the internet but I also find some at Value Village. Going through all of the used and unwanted stuff really gets me thinking about how I can repurpose them. During my last venture to Value Village, I found these candleholders.  

DIY candles-9846

I already really like the distressed look of them and think they would go really nicely in my sisters room. So since the holders didn’t need improving, I decided to make beeswax candles to put into them.

DIY candles-9663

My grandpa, and more recently my dad, has a few beehives at home. Over the years they have collected the excess wax after the extraction process and filtered it so that it may be used for candles. So lucky for me, I didn’t have to buy any of the wax for this project. The first step was to take the wax and melt it in the microwave so it was completely liquid.

DIY candles-9657

As the wax was melting in the microwave, I started boiling water in a pot and created a double boiler but with a small cylinder mold so I can get a lot of wax on the wicks for the candles.

DIY candles-9664

I then tied the wick onto a toothpick and started to dip it into the wax and refilling the cylinder as soon as it got low so I wouldn’t run out of wax halfway though the process.

DIY candles-9676

Slowly but surely the candle starts building up. in order to speed up the process I let it cool and harden for 1or 2 minutes between every coat.

DIY candles-9857

I think the colour of the candle look really nicely with the holders and the wall colour. They were super easy to make and I will definitely make more.

Professor Plum, in the library with the candlestick.

A few weeks ago I received candleholders from a friend because they were trying to make room for their move. They were very nice and tall but didn’t seem to fit in with my home decor. So with the help of my sister we started to brainstorm ideas on how we could improve these candleholders. We ended up deciding on revamping them into an outdoor beach-style holder. With the use of a little twine and glass paint we turned our idea into reality.

DIY candle holder-9782

This is what they looked like before. Notice the 80’s home décor influence? Prior to starting, we lay down newspaper and washed the holders out.

DIY candle holder-9789

Since we were using a spray can of frosted glass paint we went outside for good ventilation. Home depot sells Rust-Oleum (frosted glass) we just followed the directions on the can and sprayed 2 coats on the top and bottom of the holders.

DIY candle holder-9792

We then let them dry for 15 minutes and while we waited we tried to make our heads stop spinning from the glass paint fumes. Note to self: next time, use a respirator.

DIY candle holder-9795

After they finished drying, we brushed Modge Podge on the stem of the holders and twisted the jute around it, which created a rustic beachy feel. It was easiest to apply the modge podge in two-inch sections, so that it wouldn’t dry out or get too messy.

DIY candle holder-9839

Here is the final product. I’m already excited for patio season so that we can try them out!

Counting Pennies

Recently here in Canada we have discontinued the penny. Which alright because now I wont have as much change in my wallet. The only draw back is that we have all of these pennies lying around the house. I could start the tedious task of counting/rolling them  OR I could create something new with them. So I started doing my research and I found really some cool drink-coaster ideas using resin. People not only use pennies for coaster but also candy hearts, sparkles, shells etc. This obviously inspired me to use pennies in my resin coasters.

DIY penny-9693What I needed:

Disposable cup, disposable spoon, pennies, resin, coaster molds, and Vaseline. I found everything I needed at Michaels.

DIY penny-9697I started out be coating the coaster molds with Vaseline so that the resin wouln’t stick to them. You can use mold release but Vaseline works just as well. I chose round molds, but when it comes to coaster shapes, the skies the limit. Then in a dixie cup I mixed up the resin, as per the instructions.

DIY penny-9700I then poured a small amount of resin into the mold and let it sit for a few minutes, so that it would thicken slightly. After that I randomly placed the pennies into the resin and then poured the rest of the resin on top.

DIY penny-9702Once I let the coasters sit for another 5-10 minutes I took a straw and blew on the resin in order to release the bubbles.

DIY penny-9711I also heard that “torching” also release the air bubbles, so I took my lighter and tried it out. Both methods seemed to work equally. Just choose whichever you’re more comfortable with.

DIY penny-9695Once I finished they had to sit for 24-48 hours to cure. This was the most frustrating part of the project. I wanted to use the final project right away!

DIY penny-9739Here is an example of my very first coaster attempt. Instead of using Vaseline to help remove the resin, I used Pam instead because I read that this could also work. Unfortunately the flour in the Pam created a milky film on the bottom of the coaster, which I did not enjoy. I also didn’t like the way I arranged the  pennies in the resin, it looked too uniform. That’s what DIY projects are all about, learning through trial and error. In the end I decided that haphazardly arranging the pennies would make for a better coaster design.

DIY penny-9737DIY penny-9731

In the end I think they turned out nicely and I am definitely going to make more for my coffee table. I also found other really cool penny ideas on pinterest, for those Canadians that need ideas how to recycle                 their pennies

Everything Ombre

Today I was stumbling through the Internet and as I was “surfing the web” I realized that the “ombre” style is popping up everywhere! This website caught my eye and motivated me for my first DIY project.

http://www.craftionary.net/2012/08/30-best-ombre-diy-projects.htmlI don’t know who thought of this trend, but it seems to be catching on very fast and making a big impact in the design world. The first time I heard of it was “ombre hair” and I ended up getting it done to my hair a while back. What I didn’t think about was adding it to home designs like pottery, furniture and even incorporating it into foods.

Recently I bought an old jewelry box from Value Village for $7. In order to modernizing it I was thinking of an ombre inspired paint job.

InWood-9411

The first thing I did was remove the wind up music player in the back. Every time you opened any drawer, the music would start playing and I knew that it would get on my nerves very fast. Then I vacuumed out the inside and removed all hardware, even the hinges on the top.

InWood-9420

Once everything was removed I gave it a light sanding just so the paint would last longer.

InWood-9421

Instead of adding layer upon layer of paint, I decided to start with one layer of primer.

DIY project finish-9606

Finally the fun part! I painted the body of the box in Benjamin Moore OC-65/ Chantilly Lace. To create the ombre look I started with the darkest shade at the bottom which is 2041-40/ Juneau Spring, then 2041-50/ Sea Mist Green and the lightest on the top which is 2041-60/ Soft Mint. Once the paint finished drying, I cleaned and polished all the handles and hinges and put them back on.

DIY project jewelry-9653

With the new paint job, I think it looks much better than in the beginning. The colours give it a sophisticated and Marie Antoinette feel to it. Its amazing what a little bit of cleaning and paint can do!

Colouring outside the lines

During the summer I decided to do something fun and creative. On Pinterest I’ve seen lots of cool ways to use crayons for art. Not by colouring with them but by melting them! So i went out and bought myself a canvas board and a huge pack of wax crayons.

DIY project crayon-9628

This is the end result from my crayon adventure. Before the crayons came into play I chose a stencil I thought it suited it well. The melting wax reminded me of rain drops falling from the sky. I had seen many examples where others used different silhouettes and I thought that it added something unique to it. You can find some examples here. For the crayons I chose to use all the girly colours but also I added a bit of blue. If you want to use different hues of one colour, you may need to buy multiple crayon boxes; my jumbo box did not have enough of one colour to fill my canvas. Otherwise this project was pretty easy and straight forward.

DIY project crayon-9632

I secured the crayons at the top of my board by hot glueing them. There are different ways of doing this but this way worked well for me. Once the crayons were up, it was time for some heat. I had to try out two blowdryers before I found the one that was hot enough to melt the crayon wax. It was pretty much trial and error until I got the stream of wax to melt the way I wanted it to. It was slow going at first but after i got the hang of things it was pretty easy and soon it was finished.

So far its been hanging over my fireplace in our living room. I hope to move it into my room once I have finished my renovations. Always keep creating!

Chalk it up!

I have been thinking about re-doing my room for the last couple of months. I’ve had the same colour scheme since I was in grade 9. At the moment I have cc-212/ Danse du Soleil on three walls, cc-64/ Bonaparte as an accent wall and light wood furniture. It’s time for sprucing up!

I have always wanted a chalkboard wall or even a small section of my wall to be a chalkboard, but since I don’t want to do something too extreme, I guess I can start out with the tired looking cork board that’s in my room and breathe some life into it.

DIY project-9380

First things first, I had to remove all the papers that were pinned onto it. Also, before I applied the chalkboard paint onto it, I wanted to clean it. That way I would be sure that no dust or anything else would interfere with the paint.

DIY project-9407

Once this was done I painted 2 layers of Benjamin Moore Latex Chalkboard paint onto it. I decided to paint the border too just to make it look complete.

Instead of having a plain chalkboard on my wall, I decided that adding a border to it would give it a nice effect. I looked around in many art and craft stores for picture frames that were large enough to fit around the chalkboard without spending a lot of money. When I couldn’t find any, I decided that maybe it would be easier and cheaper to just make my own out of window/door frames.

DIY project-9419

So as the paint was drying, I measured and cut the pieces at the right length. I then glued and stapled the frames together and “Tada!” my very own, custom picture frame.

DIY project frame-9642

Once the frame was strong enough to move, I nailed it to the board and painted it in Benjamin Moore 2041-40/ Juneau Spring.

I think that the old cork board really turned out nicely once it was transformed into a chalkboard. Its a lot more versatile, it really will motivate me to continue with the room makeover that I want.

After I finished this project, I started looking though Pinterest for more inspiration and I found lots of different and great ways to use chalkboard paint.

Meet “Shhhtephanie”!

Stephanie

Hey everyone! I thought I would tell you a little about myself and about my blog.

To start out, you are probably wondering why I spelled my name with  “shhh”… My name is

Stephanie Schmitz. Even though I now live in British Columbia, Canada, I was born in Germany. In German, you pronounce my name with a “sh”, which confuses most North Americans. Since my friends have heard my family call my name this way, they will forever  overemphasize this part. I moved to Canada when I was six because my mom wanted to get closer to her family. I love it here in BC and could not imagine living anywhere else, but I do miss Germany and try to go back as often as I can.

After graduating high school I knew right away that I wanted to get into interior design. I enrolled into British Columbia Institute of Technology and started the Part-time Management Certificate for Interior Design. In the beginning it was a lot to take in, but once I got the hang of things I loved it. I completed the Certificate in the Spring of 2012 and am super excited to apply and hopefully start the full-time Diploma Program in September, 2013. Once I get in, it will be 9 months of extremely intense schooling and I will finally graduate with my Diploma. Fingers crossed!

I feel that my passion has always been in design, but I soon realized that I also enjoyed revamping things. To make whatever I had look more appealing and also to create things that look great but won’t cost a fortune to do so. In this blog, I am going to post about Do it Yourself projects (DIY) amongst other things that I love and enjoy doing. I hope you enjoy perusing my little blog.